
photovoltaic systems أنظمة الطاقة الشمسية
إظهار الرسائل ذات التسميات Solar Projects_اصنعها. إظهار كافة الرسائل
إظهار الرسائل ذات التسميات Solar Projects_اصنعها. إظهار كافة الرسائل
الأربعاء، 26 أكتوبر 2016


السبت، 17 سبتمبر 2016
Anatomy of a Solar Tracking Mount
Anatomy of a Solar Tracking Mount
Basic Anatomy
I have seen so many examples of fixed solar panels propped against an existing structure in an attempt to direct them toward the Sun. What I have not seen much written about are small, light-weight and portable solar tracking units. Why? Why would you spend several hundred dollars for something that is not being fully utilized? I would liken it to running a marathon with sandals. There are a number of outstanding products that already exist that just need to be introduced to one another.
Consumer meet aluminum T-slot extrusion. The adult tinker toy. I have used it to build several prototypes and I have even used it for the final product, it has served me well. While you get aquainted with your new friend I would like to mention that there exists a very simple and affordable solar tracker that you should also get to know. A wonderful product and the secret ingredient for making a descent tracker. You need to move the solar panel on the mount, that is where the linear actuator comes in, you might as well add them to your group of friends. For this particular build you do not need a very powerful actuator. The stoke only needs to be about 12″ long, doing this eliminates the need for limit switches because you simply adjust the position of the actuator so that it can move the full arc. The internal limit switches will stop it. As for the Solar Panel you can’t go wrong with Renogy’s line of panels. They are very quick to ship and the prices are good.
Electronics
The electronics consist of a charge controller and the solar tracker. The tracker needs to be powered by a 12v dc source, this is provided by the battery that you will be charging. You can either place the battery near the solar mount and connect them with quick-connects, or you can run a long section of heavy wire. I would advise against the latter. It will be expensive and the resistance drop in a 12v dc system is enormous. Simply purchase a portable battery box with has charge status indicator and external connectors. You could save a step and purchase a complete power pack that you can just connect directly to and more importantly it is portable.
Assembly
Of all of the portable solar tracking systems I have built in the past this is by far the lightest and easiest to put together. It only weighs about 25 pounds, is easily assembled in minutes, wheeled into position and it can be stored flat.
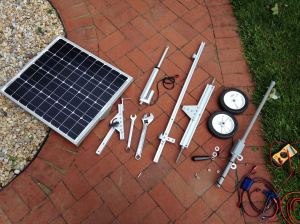
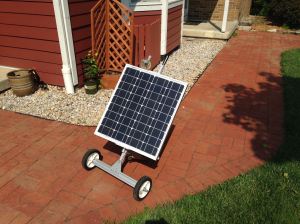
The mount is constructed of aluminum T-slot extrusion that is put together with a T-wrench. A length of 1/2-20 all thread is passed through the body of the bottom extrusion and the wheels are attached with a box wrench using lock-nuts.
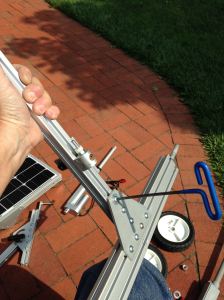
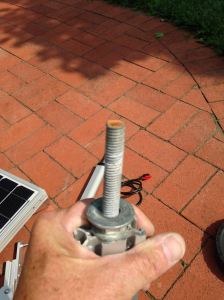
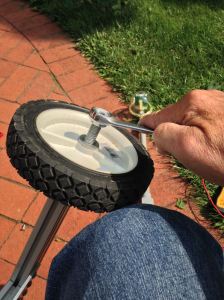
The base is a “T” configuration to create a three point base. A pivot bracket with a turn-knob provides the inclination adjustment. The Solar Panel is equipped with a top and bottom bracket for mounting, this allows the panel to pivot on it’s own axis.
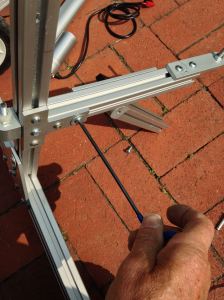
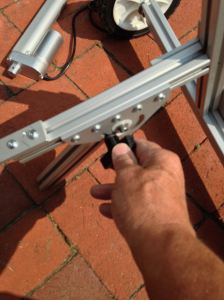
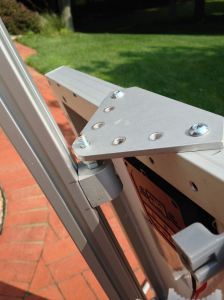
With the solar panel mounted, install the solar tracker on the right side of the panel as shown. It is secured in-place with conduit clamps on the top and bottom.
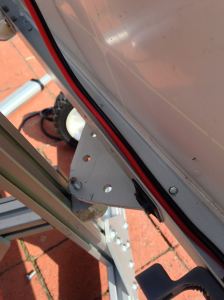
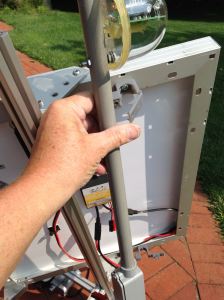
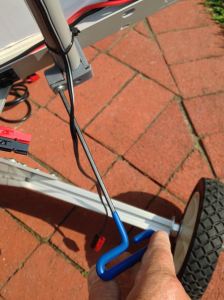
The actuator mounts on top connecting the solar panel with the actuator bracket.
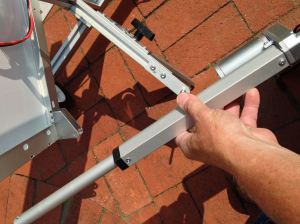
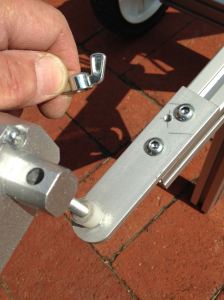
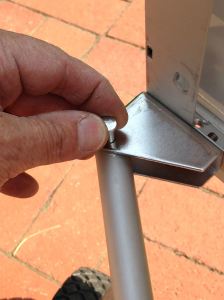
Wiring Connection
All of the connections are made with Anderson Connectors, they connect the Solar Panel, Charge Controller & Linear Actuator. The solar tracker requires 12v dc power to work. This is provided by the same storage battery that you will be charging. This will either need to be placed near the mount or connected with a long section of heavy wire to a remote location. That is another reason to avoid a lead acid battery, the weight of this battery will make it awkward to carry while wheeling the mount. One solution is one of the portable power packs with LiFePO4 batteries. The actuator bolts in-place on the top.
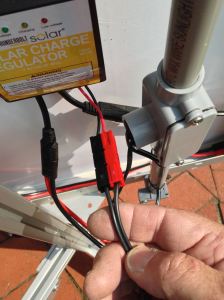
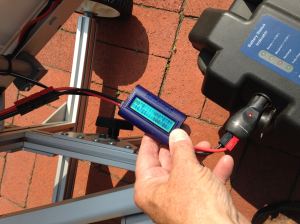
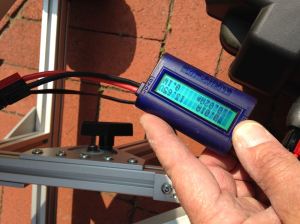
The final step is to connect the storage battery to the system. The 12v dc power feeds the solar tracker, which in turn drives the actuator East and West. The 12v dc power also powers the Charge Controller which directs power to the storage battery as needed. The Charge Controller is also connected to the Solar Panel which provides the DC power to charge the battery.
Operation
When the Sun rises in the East the solar tracker will produce an output to the actuator which will cause the panel to pivot on it’s axis. The actuator will continue to move until it is aligned with the Sun. This process will repeat itself until the Sun sets in the West. If clouds should block out the Sun the solar tracker will detect it as soon as it reappears.
The mount can be modified to accept a 100 watt solar panel.
https://medomyselfblog.wordpress.com/2015/10/24/solar-tracker-anatomy/
الخميس، 15 سبتمبر 2016
Make your own Solar Mobile Charger
Make your own Solar Mobile Charger
http://www.techulator.com/resources/10562-Make-your-own-Solar-mobile-charger.aspxنظام تتبع شمسي (Solar tracking system)
يعرض هذا الفيديو فكرة لمشروع تتبع شمسي (Solar tracking system) مميز وبأكثر من تقنية … نشاركك هنا بافكار تصنيع هذا المشروع وكيفية تحليله وما هي المكونات المطلوبة والمتحكمات والمجسات … لا تضيع فرصة معرفتها ….
الاثنين، 4 يوليو 2016
كيف تصنعها بنفسك سخان شمسي بسيط للماء
كيف تصنعها بنفسك سخان شمسي بسيط للماء
بمناسبة فصل الشتاء والبرد الشديد
تعد المنطقة العربية من أغنى المناطق في العالم بالطاقة الشمسية لكن تبقى هذه الطاقة مهدرة و غير مستغلة في منطقتنا , بالطبع التكلفة العالية للخلايا و السخانات الشمسية التي تقدمها الشركات هي من أهم أسباب العزوف عن إستغلال تلك الطاقة المجانية الرائعة .
بما إنني من مشجعي الطاقة الخضراء فقد بحثت في نظرية عمل أحد التطبيقات البسيطة للطاقة الشمسية و هي السخانات الشمسية و كيفية تصميمها في المنزل دون الحاجه لشراء سخانات بتكلفة باهظة . السخانات الشمسية أو المجمعات الشمسية هي أحد أهم الإستخدامات المباشرة للطاقة الحرارية القادمة من الشمس
بما إنني من مشجعي الطاقة الخضراء فقد بحثت في نظرية عمل أحد التطبيقات البسيطة للطاقة الشمسية و هي السخانات الشمسية و كيفية تصميمها في المنزل دون الحاجه لشراء سخانات بتكلفة باهظة . السخانات الشمسية أو المجمعات الشمسية هي أحد أهم الإستخدامات المباشرة للطاقة الحرارية القادمة من الشمس
تعود فكرة إستخدام السخانات الشمسية إلى ما قبل عام 1900 ميلادية في الولايات المتحدة الأمريكية و قد زاد الإهتمام بإستخدام السخانات الشمسية كمورد بديل للطاقة خلال أزمة عام 1973
تعتبر قبرص و الكيان الصهيوني أكبر مستخدمين للطاقة الشمسية بالنسبة لعدد الأفراد ففي الكيان الصهيوني يصل نسبة المنازل التي تستخدم الطاقة الشمسية في 85% أي 3% من إستخدامهم للطاقة و يوفر هذا أكثر من مليوني برميل بترول سنوياً و هو المعدل الأعلى في العالم .
فكرة عمل السخانات الشمسية :
لصناعة سخان شمسي لابد و أن كون ملماً بمبدأ عمله قبل أن تتعلم طريقة صناعة السخان الشمسي ذاتها
السخانات الشمسية سواء أكنت ترغب في إستخدامها لتسخين الماء أو تدفئة الهواء في فصل الشتاء فنظرية العمل واحدة و هي تجميع أكبر قدر من الحرارة و تقليل الهدر فيها ثم تمريرها للوسيط الذي ترغب في تسخينه لتستخدمه في أغراضك سواء أكان الهواء أم الماء مع بعض الإاختلافات في طريقة العمل فقط
1- مادة لإستقبال الحرارة و تخزينها
هي القطعة الأساسية في فكرة عمل السخان الشمسي , و تعتبرأفضل المواد لإستقبال الحرارة و توصيلها هي المعادن و لاسيما النحاس (الأكثر كفاءة ) و الألومونيوم ( الأرخص و الأقل وزن) ثم الحديد بينما يعد البلاستيك مادة رديئة الإمتصاص للحرارة .
في حالة الرغبة في تسخين الماء يفضل إستخدام لفات من المواسير المعدنية التي يسير فيها الماء و التي يتم طيها عدة مرات لتقليل المساحة المستخدمة مع زيادة تعرضها للشمس ( يمكن أيضاً إستخدام مواسير أو خراطيم بلاستيكية و هي أقل في الكلفة لكن تكون أقل كفاءة )
في حالة الرغبة في تسخين الهواء بغرض التدفئة يمكن إستخدام شريحة معدنية أو عبوات مفرغة لتقوم بمهمة تسخين الهواء
2- طلاء ماص للحرارة
الطلاء الأسود للأجزاء التي تستقبل الحرارة و تخزنها في السخان يساعد على أمتصاص أكبر قدر ممكن من الحرارة و كلما كان الدهان المستخدم مطفأ و غير لامع كلما زادت كفاءة إستقبال الحرارة .
3- نافذة زجاجية أو من الأكريليك
تغطي الجزء المعرض للشمس من السخان الشمسي , النافذة الزجاجية لها دور مهم في إحتجاز الحرارة فيما يعرف بتأثير الصوبة الزجاجية و هو ما يساعد على حفظ الحرارة
فكرة ! يمكنك إستخدام إحدى النوافذ المواجهة للشمس كسخان شمسي بعد دمج العناصر الأخرى معها
4- إطار خشبي
يستخدم إطار خشبي لجمع أجزاء السخان الشمسي و كمصد للرياح التي تساهم في تسريب الحرارة
5- مادة عازلة
تبطن خلفية الإطار الخشبي للسخان الشمسي بمادة عازلة للحرارة حتى يمنع تسرب الحرارة من الأجزاء غير المواجهة للشمس
6- خزان للماء
لتخزين كميات من الماء يمكن إستخدام خزان للماء الساخن الناتج عن عملية التسخين و هناك طريقتان لرفع الماء في الخزان بإستخدام مضخة أو بدون إستخدام مضخة و تعتمد على مبدأ إنتقال الحرارة من الماء الساخن للماء البارد.
نموذج لمكونات سخان شمسي لتسخين الماء
السخان الشمسي التالي للشرح فقط و هو أحد نماذج السخانات الأشهر و يمكن تصنيعه أو شراءه جاهزاً و هو يحتاج لبعض المعدات مثل معدات اللحام و توصيل المواسير و ربما نتناوله في موضوع لاحق
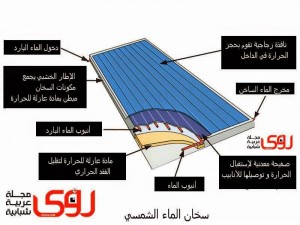
والآن لننتقل إلى فكرة أخرى لنتعلم كيف نصنع سخان شمسي بسيط للمنزل و بطريقة سهلة و غير مكلفة و لا تحتاج لأدوات أو معدات مكلفة أو غير متوفرة في المنزل لدى الأشخاص العاديين .
اصنع بنفسك في 30 دقيقة سخان شمسي من خراطيم المياه
اصنع بنفسك في 30 دقيقة سخان شمسي من خراطيم المياه
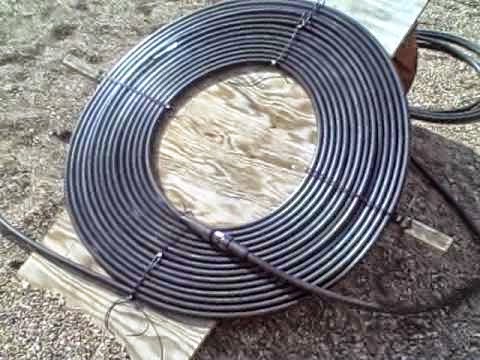
من أبسط نماذج السخانات الشمسية التي يمكنك أن تصنعها بنفسك نموذج السخان الشمسي المبني على خراطيم مياه ري الحدائق ,حيث يدخل الماء من أحد طرفي الخرطوم و يمر في لفات الخرطوم المعرضة للشمس ثم يخرج ساخناً من الطرف الآخر و كلما زادت عدد لفات الخرطوم كلما زادت قدرته على التسخين و الكمية التي يمكن تسخينها
1- قم بشراء 40 متر من خرطوم ري الحدائق القادر على تحمل حرارة الشمس
2- قم بلفه و تثبيته على لوح خشبي بأي طريقة مناسبة مثل المسامير أو الربط بالحبال ...الخ
3- قم بوضعه في مواجهة الشمس فوق سطح منزلك أو في منطقة مفتوحة
2- قم بلفه و تثبيته على لوح خشبي بأي طريقة مناسبة مثل المسامير أو الربط بالحبال ...الخ
3- قم بوضعه في مواجهة الشمس فوق سطح منزلك أو في منطقة مفتوحة
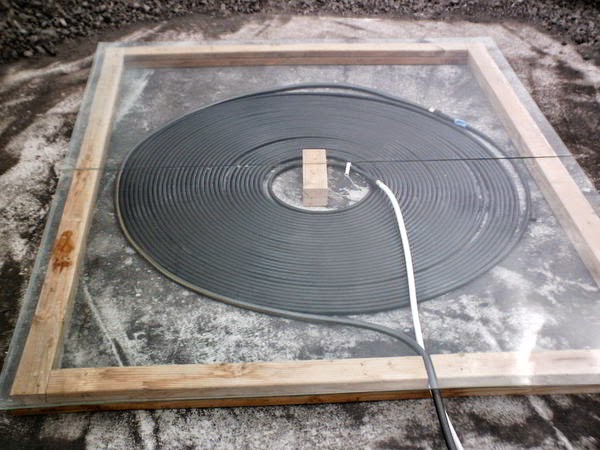
4- يفضل إضافة بعض العناصر التي تحدثنا عنها سابقاً مثل البرواز و العزل و النافذة الزجاجية ( زجاج إكريلك أو أي زجاج مقاوم للحرارة) وذلك للحفاظ على حرارة المياه الناتجة في السخان لأطول فترة ممكنة
فكرة ! ما رأيك في عمل غطاء عازل أمامي يغلق للعزل ليلاً للحفاظ على حرارة الماء خصوصاً خلال فترات الشتاء حيث يفقد الماء حرارته سريعاً.
5- يمكن إضافة خزان ماء للنموذج السابق لزيادة سعة الماء المخزن و الخزان هنا يقوم بتسخين الماء تلقائياً بدون مضخة حيث ينتقل الماء الساخن لأعلى الخزان حيث يمكن وضع صنبور أو نقل الماء للإستخدام الداخلي بالمنزل
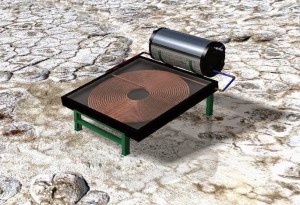
و يمكن أيضاً استخدام فكرة السخان المبني على خراطيم المياه بصورة جمالية مثل الموجودة في الصورة حيث تم إستخدام المسامير في تثبيت السخان بالألواح الخشبية بحيث تدق المسامير بين اللفات و بعضها البعض
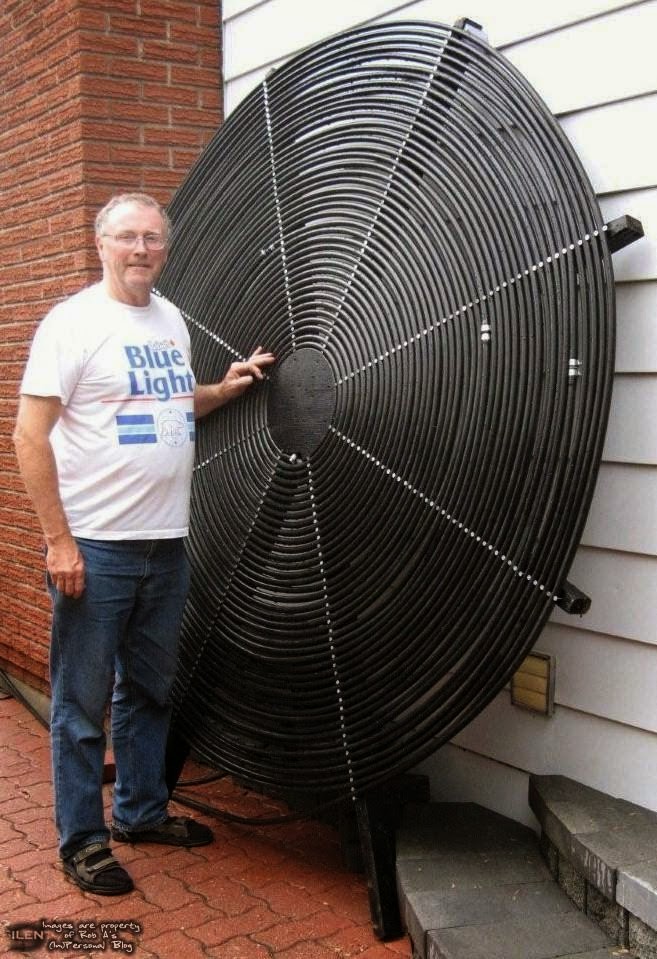
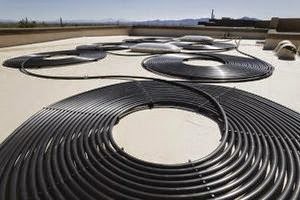
كما يمكن إستخدام عدة لفات من الخراطيم مع توصيلها معاً بغرض زيادة مساحة سطح تعرض الماء للشمس
شاهد الفيديو التالي لصناعة سخان شمسي بكفاءة جيدة من خراطيم المياه
http://review.topmaxtech.net/edu/physics/%D9%83%D9%8A%D9%81-%D8%AA%D8%B5%D9%86%D8%B9%D9%87%D8%A7-%D8%A8%D9%86%D9%81%D8%B3%D9%83-%D8%B3%D8%AE%D8%A7%D9%86-%D8%B4%D9%85%D8%B3%D9%8A-%D8%A8%D8%B3%D9%8A%D8%B7-%D9%84%D9%84%D9%85%D8%A7%D8%A1-%D8%A8/40233.html
الأحد، 22 مايو 2016
Make your own Solar Mobile Charger
Make your own Solar Mobile Charger
A solar panel converts solar energy into electrical energy. Solar mobile charger regulates this electrical energy such that it could be used to charge mobile phones. Read this article to know how to make a solar mobile charger at home.
Solar mobile charger
Solar mobile charger is a device which can charge mobile phones using solar radiation. Its major component is a compact solar panel. This solar panel traps solar energy and produces an output voltage. But, since the light radiations falling on the solar panel can vary, the output voltage becomes unstable. For charging a mobile phone, stable voltage is required. So, to make the output voltage stable and regulated, we use a voltage regulator circuit along with the solar panel.
Most of the mobile phones have computer connectivity via USB cable. USB port establishes 4 connection terminals. The connection terminals at the two extreme ends are the supply terminals. In a female USB connector (port via which we plug in USB devices to computer), these terminals carry 5V DC. When a mobile phone is connected to the USB port of a computer, it utilizes this 5V supply to recharge battery. This feature is used in a solar mobile charger. It converts and regulates solar energy to 5V DC and the output will be available through the female USB connector. To this connector, we can easily connect a mobile phone via data cable.
Materials required
2)Voltage regulator IC 7805
3) 100uF, 25V capacitor
4) 10uF, 25V capacitor
5) 100nF capacitor
6) USB female connector
7) PCB
8) Connecting wires
9) Soldering accessories
Let's start building
Solar panel

First of all, take the solar panel. On its back side, we can see two connecting wires. One is in red colour and the other is in black. The red wire is the positive terminal and the black wire is the negative terminal. There is nothing much to do with the solar panel.
Voltage regulator
The regulator circuit consists of the following components.
1) IC7805
2) 100uF
3) 10uF
4) 100nF
Circuit diagram

Regulator on PCB

Solder all the components on a PCB as shown in the circuit diagram. To test the regulator circuit, connect voltage between 8 V and 18V to the input of voltage regulator. Now, measure the output. The output should be constant and it can be any value between 4.75 V and 5.25V. If so, your circuit is working properly.
Next, we need to connect it to the USB port. This has to be done carefully

Solder the positive output wire of the voltage regulator to the USB's positive. Similarly, connect the negative output of regulator to the negative of USB. The USB port must be fixed properly to the PCB. Next, connect the solar panel to the input of the voltage regulator (positive of solar panel to positive input of voltage regulator and negative of solar panel to negative input). Once everything is connected, measure the output voltage in open sun light. It should be around 5V. Now, connect your mobile phone and you will see it charging.

Once everything is done, fix the circuit properly on a plastic box. The solar panel should face the Sun
http://www.techulator.com/resources/10562-Make-your-own-Solar-mobile-charger.aspx
السبت، 14 مايو 2016
Free Air Conditioning

The Competitive Edge......
........or how to keep your cool in a deregulated energy market.
by Michael Gunter
The Problem: "Crunch Time" 1st January 2001 is rapidly approaching. How should you respond when electricity retailers are selling heat pumps to fill their coffers in the winter-time, when economic uncertainty is impacting on infrastructure investment decisions, and when all the players in the deregulated energy markets are chasing market share and emissions growth, or just being ultra-conservative screen jockeys who don't know a megawatt from a megawatt-hour? Welcome to the world of deregulated energy markets!You could get advice from a market analyst, and try to learn how to negotiate with a variety of electricity retailers in order to strike a deal for the best price per kilowatt-hour. You could be seduced by slick marketing to buy a heat pump air conditioner in the hope that affordable electricity prices (and a lack of power restrictions or blackouts) will make it a useable asset.Or you might decide to walk away from the whole tawdry mess of electricity industry privatisation, and strike a blow for energy independence, by implementing a series of economically efficient strategies. These might include: buying low energy light globes; unplugging all appliances at night; shading summer sun from all exposed windows to the east, north and west of your premises; installing a solar water heater; and even making a solar powered evaporative cooler as a do-it-yourself project! (see below).This is especially the case if you are a home owner wondering how best to invest in renewable energy to create a sustainable future for your kids. Well-off people with some spare cash to splash are particulary the ones who should consider leveraging the competitive energy market: they tend to burn more fossil fuels, one way or another, than the poorer sections of Australian society, and by exercising their commercial clout in the electricity market en masse, can potentially help to keep electricity prices lower for everybody next summer. This is because energy conservation on a wide scale can help lower the cost of wholesale electricity generation, this in turn helps ensure that electricity prices for all consumers will be lower than would otherwise be the case. It is also getting to the stage where somebody is going to have to take responsibility for preventing power blackouts during heatwaves, and, on recent form, it seems that neither state governments, privatised electricity industry participants nor trade unions can necessarily be relied upon for common-sense action in the public interest:Summertime Blues. Air conditioning load, in the form of reverse cycle heat pumps has been creeping into modern homes and offices at an alarming rate. In our free market there seem to be no controls on the amount of installed capacity. The market design almost demands that shortages must occur, triggering massive electricity price rises, before the "market signal" is created to start the building of more electric power stations. This is the crazy implementation of market reform we are stuck with, at a time when Australia, the notorious OECD greenhouse emissions basket-case, is supposed to be reducing greenhouse emissions! The Electricity Supply Association of Australia is on the public record in castigating consumers for our profligate wastage of electricity, so the industry cannot possibly complain if we take the initiative in forcing real reductions in electricity consumption and greenhouse gas emissions.
The solution: Apart from solar water heating and energy conservation measures mentioned above, the big thing every non-tropical Australian can do is buy, beg, borrow or steal an evaporative cooler, so that your reverse cycle heat pump can be reserved for what it was supposedly purchased for: namely winter heating. People, yes even rich people, should be prepared to tolerate the lesser comfort of evaporative cooling, safe in the knowledge that they are doing something really effective to mitigate greenhouse gas emissions, prevent global warming, suppress summertime electricity prices, and even improve Australia's balance of payments by not having to import all the parts for the construction of unnecessary power stations. This is yet another classic case where suppressing the nation's GDP has hugely positive effects on our quality of life and our "sustainability index".
Free Air Conditioning: My prototype solar powered evaporative cooler is great in the situation where there is a failure of the electricity market during a heatwave (i.e. a power blackout or power restricitions). With a BP Solar 75 watt panel, a "Rule" 12 volt bilge pump and 8, 12 or 20 second-hand computer fans, it is possible to make your own cooling sytem that will keep a well shaded room reasonably comfortable through even severe dry summer heatwaves: Figure 1 indicates that the computer fans are connected in a tight-fitting array across the front or back of any old evaporative cooler. The standard evaporative cooler can retain its AC motor and pump, or can be gutted, as all we need from it is the air tight box, the water tray and the aspen (wood shavings) evaporative pad or "filter". An integral part of this arrangement is a Mini Maximiser current pulsing FET switch which allows excellent start-up each morning, and even some functionality under hazy or slightly overcast skies. The computer fans can be substituted with a single large 12 or 24 volt DC fan such as the Davies-Craig automotive cooling fan, say a 25 cm or 30 cm diameter model. The Voltscommissar home page contains links to additional description of the unit, and some photos of the prototype in action at the CERES site on a very hot day last summer.
Figure 2 is the schematic electrical diagram. My BP Solar 75 watt panel has a 6 volt tap in its junction box, and this is ideal for running the bilge pump under full-sun conditions, as it will greatly extend the life of the pump at this lower voltage (7 to 8 volts in practice), AND allow more power to the air fans. The positive supply rail from the PV panel to the pump, via the Mini Maximiser, must be the NON-SWITCHED supply to the pump. The simplest way to understand all this is to study Figure 2 showing a POSITIVE EARTH supply rail at the bottom: this is "zero volts" and the Mini Maximiser gets a "minus twelve volt" supply from the PV, while the bilge pump has the option of being supplied via the MiniMaximiser, or direct from the "minus six volt" rail from the PV.
Optimising cooling performance
Most suppliers sell small room coolers on a pedestal or trolley. You are supposed to place it inside the room near an open window. This would be fine if it was easy, or even possible at all, to make a tight seal between the rear inlet of the cooler, and the open window.The lowest room temperature can be obtained only by minimising the flow of hot air into the room or space to be cooled. It is also extremely important of course to provide external shading with trees, blinds (awnings), shutters, or even bed sheets (!) to prevent any direct sunlight entering the room.The best way to prevent hot air entering the room is to install your cooler outdoors, and blow the air in through a casement (slide-up-and-down) window, ideally at floor level. Suitable baffles to create a close fit between the front of the cooler and the window frame can be constructed from scrap styrofoam, cardboard and duct tape, or even cloth bolsters packed with spun acrylic fibre or foam plastic. Just about any lightweight object that can plug the gaps will greatly reduce the intrusion of hot "untreated" air into the room.Seal up the rest of the house, close all the doors (oops, you have an open-plan house? bad luck...)


http://www.voltscommissar.net/competitive_edge.htm
Build Your Own Solar Generator
Build Your Own Solar Generator
John provides a very detailed description of a small and portable solar generation system that can provide power for emergencies or camping or routine use. The system consists of a 45 watt PV panel, a charge controller to regulate battery charging, an off the shelf power pack that contains both the battery and inverter, and a PVC pipe rack you make to support the panel. The system will provide power for things like a laptop, some modest lighting, charging cell phone batteries, and a number of other things that are very handy to have in an emergency. The instructions are very detailed and the project is easy to build. A good way to get started with solar. Thanks very much to John for providing this material! If you are looking for a larger system that uses deep cycle batteries and will power more things for a longer period, have a look at this section... |
 Full system |  Charge controller |  PVC pipe support rack |
Full details on how to build this project... (a 34 page pdf)
A Small, Portable PV System for Camping, Emergencie
A Small, Portable PV System for Camping, Emergencies, ...
This is a very nice, small PV system from Kevin that he uses for camping, but could be used for a variety of small electrical needs. Thanks very much to Kevin for sending this in! |
Portable PV for Camping
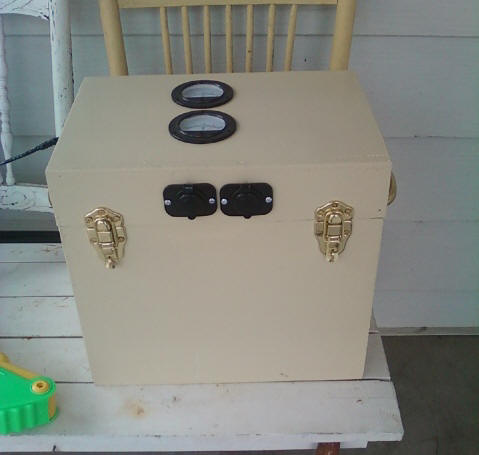
I put together this little solar battery charger. We do a lot of dry camping but I still wanted a little light and someplace to charge my cell phone. Just the right size for camping, and easy on the budget.
 | 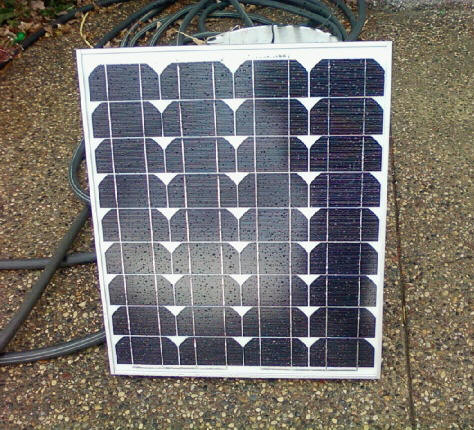 |
It also has a 1200 watt inverter for occasional use. The plan is to add another solar panel or just one larger one and also get a better Battery.
I've got two meters, one to show the battery Charge and one to show the power coming in from the panel. The picture of the top of the battery shows about 15 volts coming in from the panel on a cloudy day. (the battery meter isn't hooked up yet)
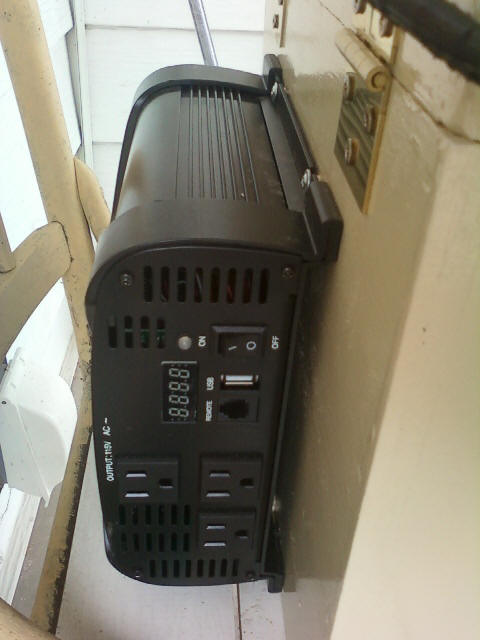 | 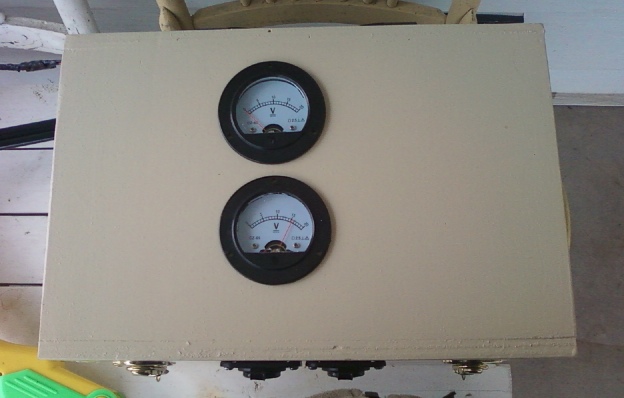 |
I use a Sunsaver-10 Charger controller.
I have a fuse block that has room for up to 6 circuits.
 | 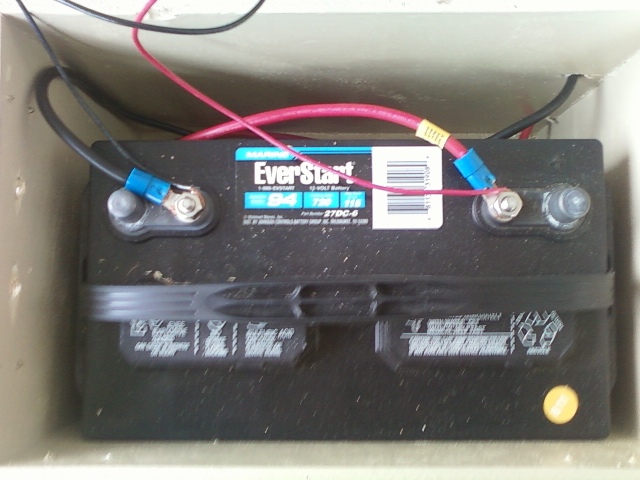 |
The battery is just a deep cycle battery from Walmart and I have an automotive battery mount holding it in place. I also have 8 holes drilled into the box for ventilation.
The panel is a 50 watt 2.98 amp panel.
I have two power outlets (only one is hooked up right now) that will work with my cell phone charger. I also wired up two 15 watt 18" fluorescent fixtures that I hooked up to a regular car charger type plug in. I use just one or both lights. It works better than a flashlight when going to bed in the tent, and saves on disposable or rechargeable batteries.
I have two power outlets (only one is hooked up right now) that will work with my cell phone charger. I also wired up two 15 watt 18" fluorescent fixtures that I hooked up to a regular car charger type plug in. I use just one or both lights. It works better than a flashlight when going to bed in the tent, and saves on disposable or rechargeable batteries.
Nothing fancy, kind of fun to put together and had fun with the kids explaining how it all goes together and what makes it work. Thought I'd share.
Regards,
Kevin
Regards,
Kevin
Make a Bicycle Generator
Make a Bicycle Generator

A Free Pedal Powered Generator
Anyone can make a free pedal powered bicycle generator with a bike and some salvaged materials. The bike generator shown here cost a total of $0 - Zero Dollars. It was all free stuff salvaged from the junk.
Whether you want to go green or power a cabin in the woods, a bike generator is the perfect device to help keep your batteries topped off during periods of clouds or no wind. If you are using solar power, you can go days at a time with no sun. If you are using wind energy, often the wind will not blow for a few days. In either case, you may need to produce some extra energy to help keep your power on.
The bike used for this project had been sitting in someone's yard for years. It needed some oil and some cleaning, but it was fixable. The tires were dry rotted, but were removed anyway for the project. Just to prove a point, the chain was siezed up and rusty in many points, but with some oil and two pairs of pliers, the chain was freed up again. Soak the chain in penetrating oil for a few days. Then you can carefully and slowly work the siezed chain links back and forth until they move freely. (Good information in a survival situation.)
For the generator, a free treadmill was scrapped out for its motor. You can get free treadmills all the time. They are so huge, people are happy to get rid of them. They have a DC motor inside, which is perfect for a homemade people powered generator.
Any DC (direct current) motor will work for a homemade generator as long as its original voltage rating is higher than the voltage of the device you want to power. In our case, the batttery bank of 12 volts DC requires about 14 volts to charge them. The treadmill motor was rated at 90 volts DC. More than enough to charge batteries. Actually, this means that you do not need to turn the motor as fast in order to get a decent charging voltage out of it.

The frame was made out of scrap lumber found laying around. You can ask around if you do not have any yourself. The important point in making a frame is to use a long board starting in front of the back tire of the bike and extending a few feet behind the bike. This will be for the generator mount.
In the photo above you can see the side stands which will hold the back wheel off the ground. A long board goes from left to right underneath the bike to give the whole thing stability and keep the bike from tipping over.
Below you can see a pair of BMX bike foot stands, which you often find on the front or back wheels of a BMX stunt bike. If you cannot get them off an old bike, you can get them off ebay for a couple bucks.
On the image to the bottom right, you can see the rubber tire has been removed from the bike. A large "V" belt is now put on the wheel in its place. You will need to remove the wheel from the bike for this part. Do it at the same time as you replace the wheel mounting nuts with the BMX bike pegs. You will actually replace the original wheel mounting nuts with the bike foot pegs. The pegs will enable the bike to stay upright in your homemade bike stand.
Ask around at a farm for an old belt you can use. Most farmers will have a bunch of old belts laying around. If not, you can get one at an auto parts store. Measure the size you need with a long rope or string.


In the photo below you can see that a piece of angled board was cut and nailed into place to hold the bike stand steady. Secure both sides in this manner. Also important to note is that a notch was cut out of the bike stand on each side to hold the bike pegs in place.

Mount your DC motor onto the end of the long board that extends out behind the bike and run the belt around its pulley. In this case the belt fit perfectly on the motor with no modifications needed. Actually this whole project went together quite well with no extra parts or mods needed. Everything was nailed together, including the treadmill motor. Nails were driven into the board through the motor mount holes, then bent over a bit to keep the motor in place. There is no spring to keep tension, so the motor was held in place with the belt under tension while the nails were pounded in.
A flat board was placed underneath the front wheel just to add stability on the soft ground because this is an outdoor generator.


You will want to make some type of cover for the motor if you will be leaving your homemade pedal powered electric generator outside for long periods. The motor and bike both need to be protected from the elements.
You will need a charge controller attached to your batteries to protect them from over charging. Or you can use a volt meter and watch the voltage while you pedal the generator.
Here is a video of the bike generator in action:
-
http://www.thedoityourselfworld.com/DIY-Bicycle-Powered-Generator.php#sthash.9H7LIIc4.dpuf
الاشتراك في:
الرسائل (Atom)